
There’s nothing quite like carrying the essentials of life on your back and stepping out into the wilderness for a few days. All you really need is a tent, a sleeping bag, a sleeping pad, a stove, food, water, rain gear and some first aid items. To some this may sound like a pretty heavy pack once you add everything up, but if you’re a landscape photographer, like myself, this pack is more like a featherweight. We don’t always pack in everything we own, but to give you an idea of how much photo gear weighs I’ve put together a pretty basic landscape photographer’s kit:
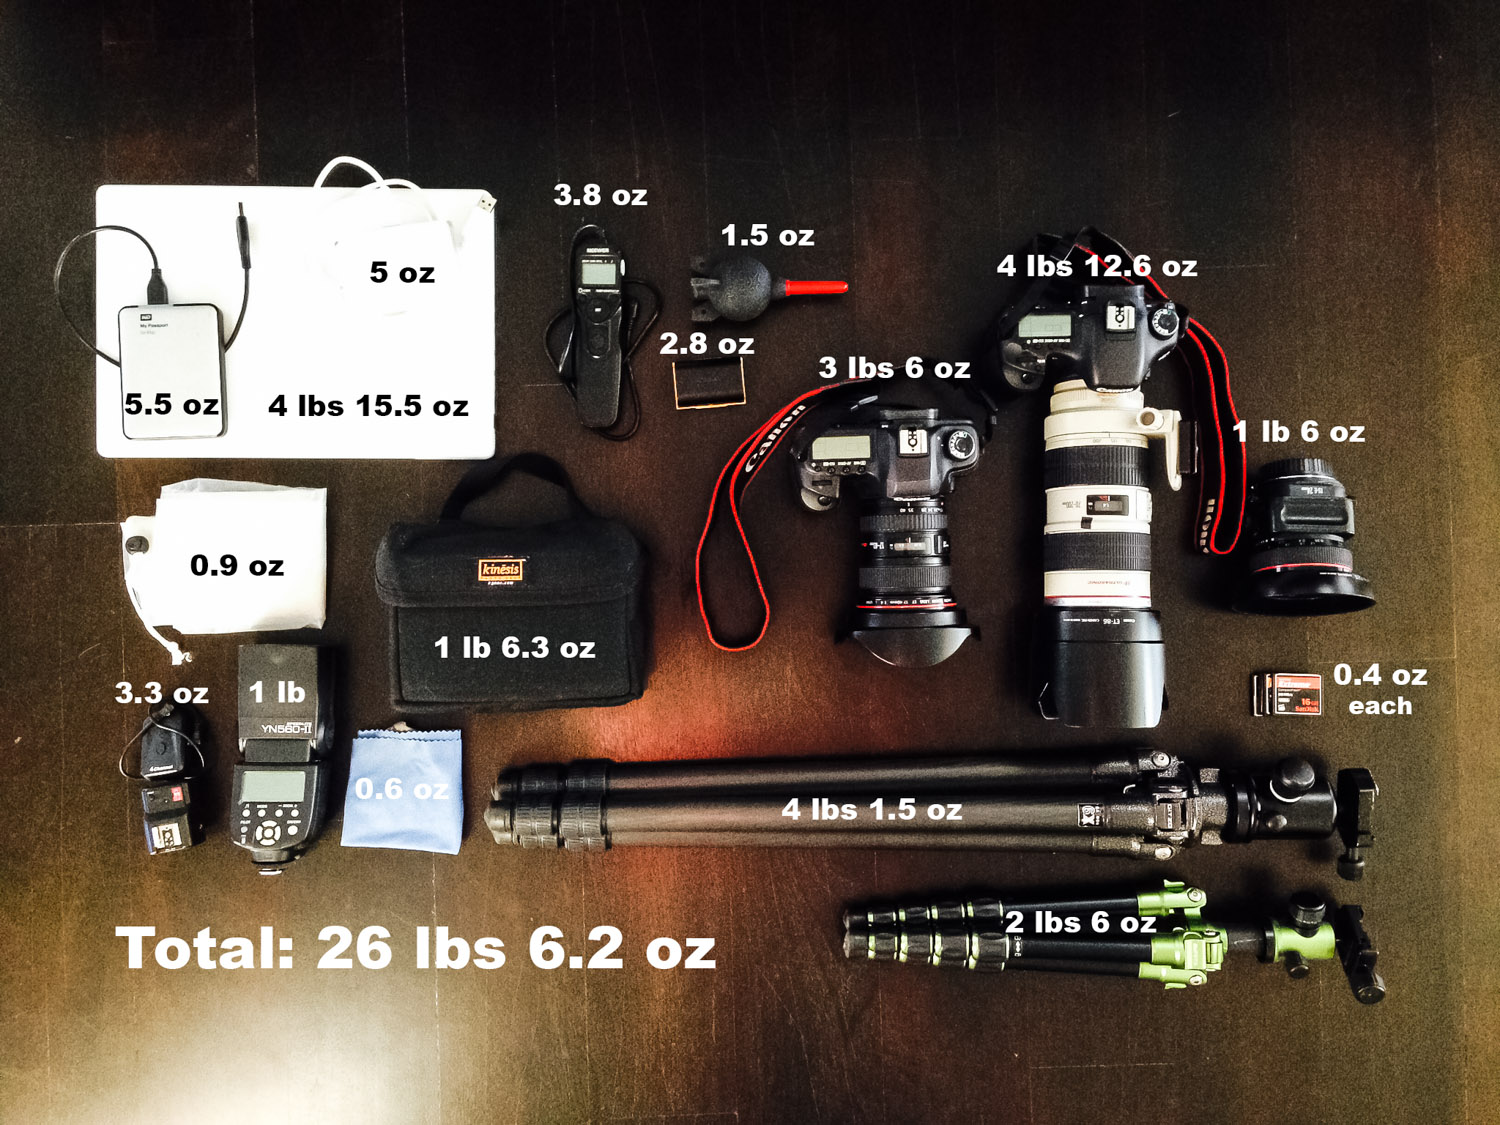
- Canon 5D Mark II and 17-40 lens – 3 lbs 6 oz
- Canon 7D and 70-200 lens – 4 lbs 12.6 oz
- Canon 24 TS-E lens – 1 lb 6 oz
- Macbook 13″ – 4 lbs 15.5 oz
- WD External Hard Drive – 5.5 oz
- Card Reader – 5 oz
- Gitzo GT 2531 with Kirk BH-3 Ball Head – 4 lbs 1.5 oz
- MeFoto Backpacking Travel Tripod – 2 lbs 6 oz
- Battery LP-E6 – 2.8 oz
- Giottos Rocket Air – 1.5 oz
- Neewer Remote Trigger – 3.8 oz
- CF Cards – 0.4 each
- Filter Pouch with Filters – 1 lb 6.3 oz
- Rain Cover – 0.9 oz
- Flash – 1 lb
- Flash remote and trigger – 3.3 oz
- Lens cloths – 0.6 oz
Some photographers may use more gear and others may use less. The point is, photography equipment is heavy. Which is why non-photographers seem to frolic on the trail in comparison. We photographers are passionate people, and admittedly, we must be a little insane to add two times the weight to our already heavy packs. I’ve gone on backpacking trips where I feel like I’ve brought everything but the kitchen sink, and other times I’ve regretted not bringing just that one extra battery. I’ve learned to go into a backpacking trip knowing exactly what I want to shoot and how I want to shoot it. The hardest part is deciding what to leave behind. I’ve been able to narrow it down a bit when I go backpacking, and depending on what I’m shooting or how long I will be out shooting I will add or subtract things from this list. I call this my bare bones kit:

- Canon 5D Mark II and 17-40 lens – 3 lbs 6 oz
- MeFoto Backpacking Travel Tripod – 2 lbs 6 oz
- Neewer Remote Trigger – 3.8 oz
- CF Cards – 0.4 each
- Rain Cover – 0.9 oz
- Lens cloths – 0.6 oz
- Singh-Ray Warming Filter – 1.4 oz
- Singh-Ray 3-Stop Reverse ND – 1.2 oz
- Batteries LP-E6 – 2.8 oz each
One of the items I knew I could save weight on was my tripod. My main Gitzo tripod, with a Kirk ball head, weighs: 4 lbs 1.5 oz and is pretty large in size. It’s something I personally don’t like to be without, but it’s a pain to pack in. So, I went on a search for a lightweight and compact tripod. I wanted it to stand at a certain height (at least 35 inches), be able to hold my heavy camera without sagging or causing too much vibration, and I wanted it to be within a reasonable price range. Was this too much to ask? In my search, I found out that it was getting to be too much to ask. There are carbon fiber tripods that would’ve been perfect, but the price was way out of my league. I was about to give up, when I found the Mefoto backpacker travel tripod at $140. I still ended up modifying it by cutting off the extended “mono-pod style” portion, making it lighter and, in my mind, more stable, and never once have I regretted buying it. It only weighs: 2 lbs 6 oz (almost half the weight of my Gitzo!) and fits inside or outside my pack without catching on trees or bushes along the trail. Another option that I have yet to trust completely, but know others who swear by it, is using a rock or a balled up jacket as a steady surface to create long exposure shots. You can definitely get creative in saving weight, just take into account what you’re willing to sacrifice.

One of the hardest parts for me when narrowing down my kit is deciding which lens(es) to carry. At times I have carried both my wide (17-40) and zoom (70-200) lenses, cursing the decision along the way, but happy with my choice in the end. Other times I haven’t even touched my almost 3 lbs 70-200. Pre-planning and pre-visualization are crucial for backpacking photographers. If you don’t know what you want to shoot, you will end up bringing everything but the kitchen sink. Sometimes bringing one lens can benefit your creativity. If you are forced to stick to one lens you can get pretty creative. Take for example the shot below. When I saw these moose, and if I’d had my 70-200 zoom lens, I would’ve thrown on my zoom and gotten a typical close-up moose photo. Instead, because I was limited to what I had brought on the backpacking trip, I only had a 17-40 wide angle zoom. So, I used my ninja sneaking skills and got as close as possible and framed the moose within their habitat. In the end, I was able to tell more of a story with a unique point of view and come home with one of my favorite shots to date.

The lesson here is to pre-plan, pre-visualize, and create a kit that you know will perform for you without breaking your back (or the bank). With certain projects, you may not be able to avoid bringing your entire kit, just make sure you will use every single item. There’s nothing worse than hauling a 5 pound tripod up a mountain only to realize you didn’t need it.
Some quick tips to remember:
1. Pre-plan and pre-visualize your shots. Know exactly what kind of gear you will need, and more importantly, what you won’t need.
2. Minimize your non-photography gear. You may have to give up some luxuries to make room for that extra lens. Also, decreasing the weight of your usual backpacking gear will give you more options with your camera gear. There are a lot more options with lightweight tents and sleeping bags than there are lightweight professional cameras.
3. Don’t be afraid to get creative. Sometimes limiting your gear can be an eye opening experience, and you’ll realize how little you actually need to make compelling imagery.
4. Substitute anything you can. Use an HDR or composite method rather than bringing filters. Bump up your ISO for sunset shots, or plan on using a balled up jacket as a “tripod” for long exposures. Remember that steady rocks can sometimes work just as well as a tripod.
5. Last but definitely not least, Remember to have fun and enjoy the scenery!
Website: lindsaydanielsphotography.com
Instagram: lindsaydanielsphotography
Facebook: Lindsay Daniels Photography
Twitter: Lindsay Daniels Photo
Need a bag, case, or backpack to carry your photo gear into the backcountry? Check out Mountainsmith’s full line of backcountry photo bags.
One comment